
TIME HAS FLOWN BY AND I HAVE NOT POSTED IN QUITE A WHILE BUT I’M BACK. I’LL BE RETURNING TO NEW, FREE PATTERNS MONTHLY SO PLEASE STAY ON THE LOOK OUT FOR THOSE. ALSO FEEL FREE TO LEAVE A COMMENT ON ONE OF MY RECENT AMIGURUMI PROJECTS OR AT MY CONTACT PAGE.
THE CROCHET WHAT?! GROUP WILL CONTINUE MEETING AT THE KUTZTOWN COMMUNITY LIBRARY. PLEASE JOIN US THERE THE 3rd SATURDAY OF EVERY MONTH FROM 1-3 PM. WE ARE STILL ACCEPTING SQUARES FOR THE BLOCK PARTY QUILT. CLICK ON FREE AMIGURUMI PATTERNS FOR THE PATTERN TO MAKE A SQUARE. ALL LEVELS OF EXPERIENCE AND AGES ARE WELCOME AND WE LOOK FORWARD TO SEEING YOU.
YOU CAN GO TO KUTZTOWN COMMUNITY LIBRARY WEBSITE FOR UPDATED INFORMATION INCLUDING CANCELLATIONS. REGISTRATION IS NOT REQUIRED BUT IS APPRECIATED. AGAIN LEAVE A MESSAGE AND YOUR EMAIL AT MY CONTACT PAGE FOR ANY COMMENTS OR QUESTIONS. I WOULD LOVE TO HEAR FROM YOU👏🧶💜
AMIGURUMI scrap monster
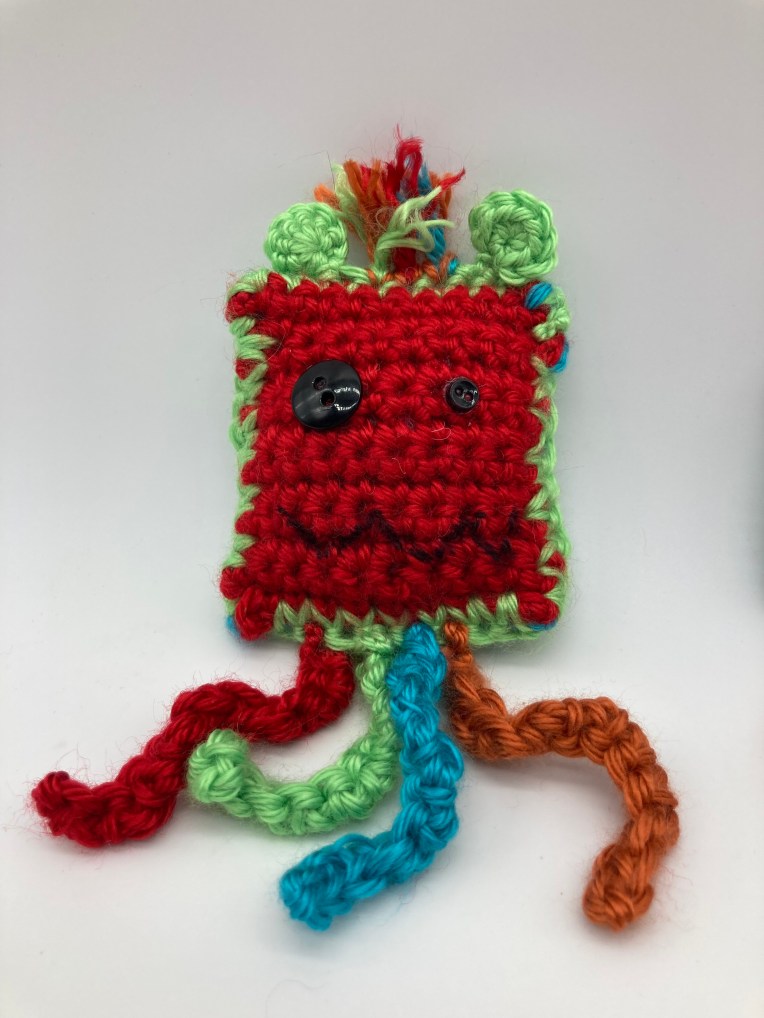
This pattern is a great beginner friendly project. It’s done in the same stitch all the way through and you can make it any size and shape you want. Plus you can use leftover yarn scraps, which is always a good thing.
Materials: 5mm crochet hook (size H), scissors, a yarn needle, #4 medium weight yarn your choice of color*, and a stitch marker such as a contrasting piece or yarn or even a bobby pin. You can make the eyes with a fine tip sharpie, fabric marker, or buttons like I did above. *I used Caron Simply Soft Yarn in various colors to get the results in the image above. Contrasting Colors for the front and back, and the arms and legs makes for a more vibrant look. Have fun choosing your colors.
Terminology: SL (slip knot) CH (chain stitch) SC (single crochet stitch) You can click on any of these stitches or go to my crochet basics page for complete video tutorials on how to complete them.
Amigurumi scrap Monster Step by Step Instructions
1) Make a slip knot and insert your hook into the loop that you have crated with that slip knot. Pull it gently to secure it to your hook.
2) Make 12 CH (chain stitches). To make a CH loop your yarn around the hook and pull through the loop on your hook. You should have one loop on your hook, repeat until you have 12 CH. (your slip knot does not count as a stitch). Make one additional CH to be your turning stitch. You will chain one turning stitch in each row. This will keep the sides of your project relatively even and straight. The CH of 12 are a base and do not count as a row.
3) Row 1- Turn you work and working back into the row of CH stitches you have made insert your hook into the first CH (not including the loop that is on your hook). You should have your loop and the stitch that you inserted your hook into on the hook. Now yarn over your hook (going all the way around the hook) and pull your hook back through the stitch. You should have two loops on your hook now. Yarn over again and pull through both loops to complete a SC (single crochet stitch). You should end up with only one loop on your hook. Mark your first SC with your stitch marker. Repeat this all the way across and you should have 12 SC. Chain one as your turning stich and turn your work to work your second row.
**Give yourself time to practice making even CH stitches and making this first Row of SC stitches. You may need to repeat it several times.
4) Row 2 through Row 14- Repeat Step 3 making 12 SC across in each row for 14 rows. After your first row make sure that you are inserting your hook into both parts of the SC stitch in each row, each stitch has a front and a back loop or two strands of yarn. You can use a pencil and paper to make a mark each time you complete a row; this helps keep count and make your front and back pieces match up. (Eventually you might purchase a stitch counter to keep count of rows and stitches, but paper and pencil work fine to start)
5) Finish off this front part of your piece by removing your hook from the loop that is on it. Snip approx. a 6-inch tail from your yarn, then pull that through the loop to secure a knot.
6) Repeat Steps 1-5 to make the back of your scrap monster.
Before you stitch the front and back of your monster together choose what is the inside and outside of the front of your monster. Working from the outside insert the safety “eyes” where you want them to create a mouth/eye. Then attach the small, clear plastic backing to secure the “eye”. If you want to make the mouth or other facial features with a fabric marker or a fine sharpie you can do that after the two pieces have been stitched together.
7) Use your yarn needle and about 18 inches of thread to whip stich your front and back pieces together. Depending on the look you want contrasting colors can give your scrap monster stand out. Stop before you stitch it completely closed and insert some scrap yarn or fiberfill to give it form. Be careful not to over stuff. Finish stitching all the way around and make a knot, leave about a 6-inch tail and cut your yarn. Clean up the body of your piece by using your yarn needle to pull the tail through the center of the body and cut the yarn so that it pulls back into the body.
8) Next you will repeat steps 1 and 2 but instead of making 12 CH make 18 chain stitches (or more, however long you want your arms/legs/tentacles to be). Finish the row of chain stiches using step 5 above (use the 6-inch tail and yarn thread to attach them to your piece). These will be your arms/legs/tentacles. I have made 4 of these and attached them to the bottom of my monster. Use your imagination to decide how many tentacles your monster will have and where to put them. This is the best part, no two scrap monsters will ever be the same, give your monster its own personality 🤗
9) If you have facial features like a mouth that you did not already add use fabric markers, or an extra fine sharpie, to give more features to your monster. I have used some extra strands of yarn, tied them at the top and snipped them off to give my monster a little hair. I used my sharpie to make one eye into an X and give a funny mouth. Yet another chance to be creative and enjoy giving that monster some personality 😎
Congratulations you’ve made your very own scrap monster! Hang it on a door, your backpack, or anywhere and spread a little amigurumi joy!
If you have questions or comments, please out to me at my contact page and I will get back to you as soon as possible. I hope you have fun with this pattern and share some amigurumi joy!
Click here at amigurumi projects to see other fun stuff I’m working on. You can do to my page free amigurumi patterns to see other patterns available for free and to share some amigurumi joy 🧶👏🤗
